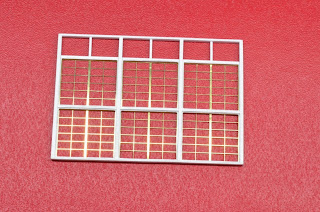
I needed to make five sets of 24' wide frames that hold two rows of the etches for the actual window frames. I knew that scratch building all five would be very time consuming so decided to see if I could cast them in Urethane. I could also supply my mate Adam with some for his Roundhouse as well and of course anyone else who wanted them. The frames not only needed to be correct in size but more importantly be able to accept the etches.
I begun by selecting the correct scale size styrene for each of the timbers. The 4 main posts sat directly on top of the wall and each of the windows sills were rebated into them. Using an engineers square, I scribed a vertical line into a 1mm thick sheet of Colourbond. Just so happened to be able to get that from Work. The MEK affected styrene will not easily stick to the steel sheet allowing easy removal of the completed frame.
I started by laying the first post along this line and held it in place with a couple bits of tape. The plans show these posts as 12"x 8" hardwood. As each of the frames will be butted together I made these from 6"x 8" giving the required 12" thick post when finished. Next was to position the lower 4"x 10" bottom sill along the lower edge of the Colourbond gluing it to the corner post. Using the window etch as a guide I glued the centre 6"x 8" post to the lower sill giving the etch just a mick hair of clearance. This should compensate for any variances in the etches and shrinkage of the casting. Using the same technique as described above, I proceeded to add the remaining two posts, centre 4"x 8" rails/sill and Top 4" x 6" rails.
Although Muswellbrook does not have any louvers above the windows like Cowra's, I added spaces for the these to the frames as well. I plan to have Andrew do a 3D print of a louver section that can be simply cast in urethane and inserted into the frame. I will just be cladding over the frame with the Corrugated iron.
To hold the etches in place, 0.020" square styrene strips are glued around the inside face of each of the frame openings. This also acts as the beading that would have held the frames on the real thing. A small piece of the 1mm Colourbond was used to set the correct distance in from the back face for the square beading. The 0.020" looked a bit bulky so thinned these slightly by scaping the surface with a scalpel blade. When the etches are inserted from the back another piece of the square styrene is glued down the centre of the etched window frame. The lower sill was also tapered away at the front edge as per the drawings. I was now able to cast the completed frame.
The below photos show the second cast frame. I destroyed the first one trying to work out how to remove it from the mould. If you look closely you can see the 0.010" styrene beading that holds the etches in place.
And here is the completed frame with etches inserted from the back. With all the etches glued in place I can airbrush the whole thing before adding the clear plastic for the window glass.
Stay Tuned.
Ian
More Signal Panel Progress
-
I have been ‘head down’ and ‘bum up’ coding in my Arduino driven
Signalman’s panel for my future exhibition layout. I’ve jumped head first
in and fixed ...
14 hours ago


