Friday, September 24, 2010

Out With One....In With Another

I hope its not just me that seems to start a different project before the one before is finished! Whether it be because you run out of materials, loose interest, or it gets put into the too hard basket. Again I have pushed aside what I had started a few weeks back and dragged out a new project. Actually this one was put into the too hard basket 6 months ago after having trouble with the decoder. As the Sydney Exhibition approaches rapidly, I thought I would try and get this project back on track and finished so I can run it on the layout at the show.

I was given a couple of Easy Kits 19 class kits to build for a club member. One of which would be for myself. As usual I could not simply build the kit straight from the box. I thought I would have a go at fitting sound to both the loco's. The 19 class kits from the box are driven with a can motor mounted in the tender and shaft drive through a gearbox to the rear diver. Fitting the sound decoder and speaker to the tender, like most other loco's, was not possible. If I was able to mount the motor inside the boiler of the loco and drive through a taller gearbox this would leave a small space inside the tender for the decoder and speaker.

I had a couple gearboxes spare from two DJH 50 class kits (another project). With a few modifications to the chassis and boiler of the 19 class, the gearbox fits perfectly with the input shaft lining up dead centre inside the boiler. I ordered a couple 10mm round can motors from the UK, along with the new gearboxes for the 50 classes, that fitted neatly inside the boiler held in place with a couple bits of blue tack. The decoder is a SoundTraxx Tsunami 750 C class mounted on top of a 15mm x 25mm speaker. I later glued the decoder to a 2 dollar coin as a heat sink. I also added a cam operated chuff to the rear loco driving wheel and extra pickups to the tender as well as the usual working headlight. The result was worth the effort. The only downfall is that once the loco is finished it is almost impossible to get to the motor. I have written a detailed article on this conversion for AMRM. At present both the loco's and running but are not finished. All that I need to do is finish off the detail work and I can send them to the paint shop. That's this weeks Job. Once the loco's are finished I can take further photos and submit the article to the magazine. Keep your eye out.
Here is a sneak preview of the pics.

View from the underside showing modifications made to the boiler and chassis.

Tsunami decoder mounted on top of speaker. I later substituted the doubble sided tape for a 2 dollar coin for heat sink.


The above two photos show both tender variants with extra pickups added.

The almost completed loco with new gearbox installed.


 I will post some pics when they are finsihed.


I promised in the last post I would try and show how to do the weathering using the Oil colours. I may have mentioned that these are Water Mixable Oil Colours from Windsor & Newtons. Below is the process on the NR and 42.

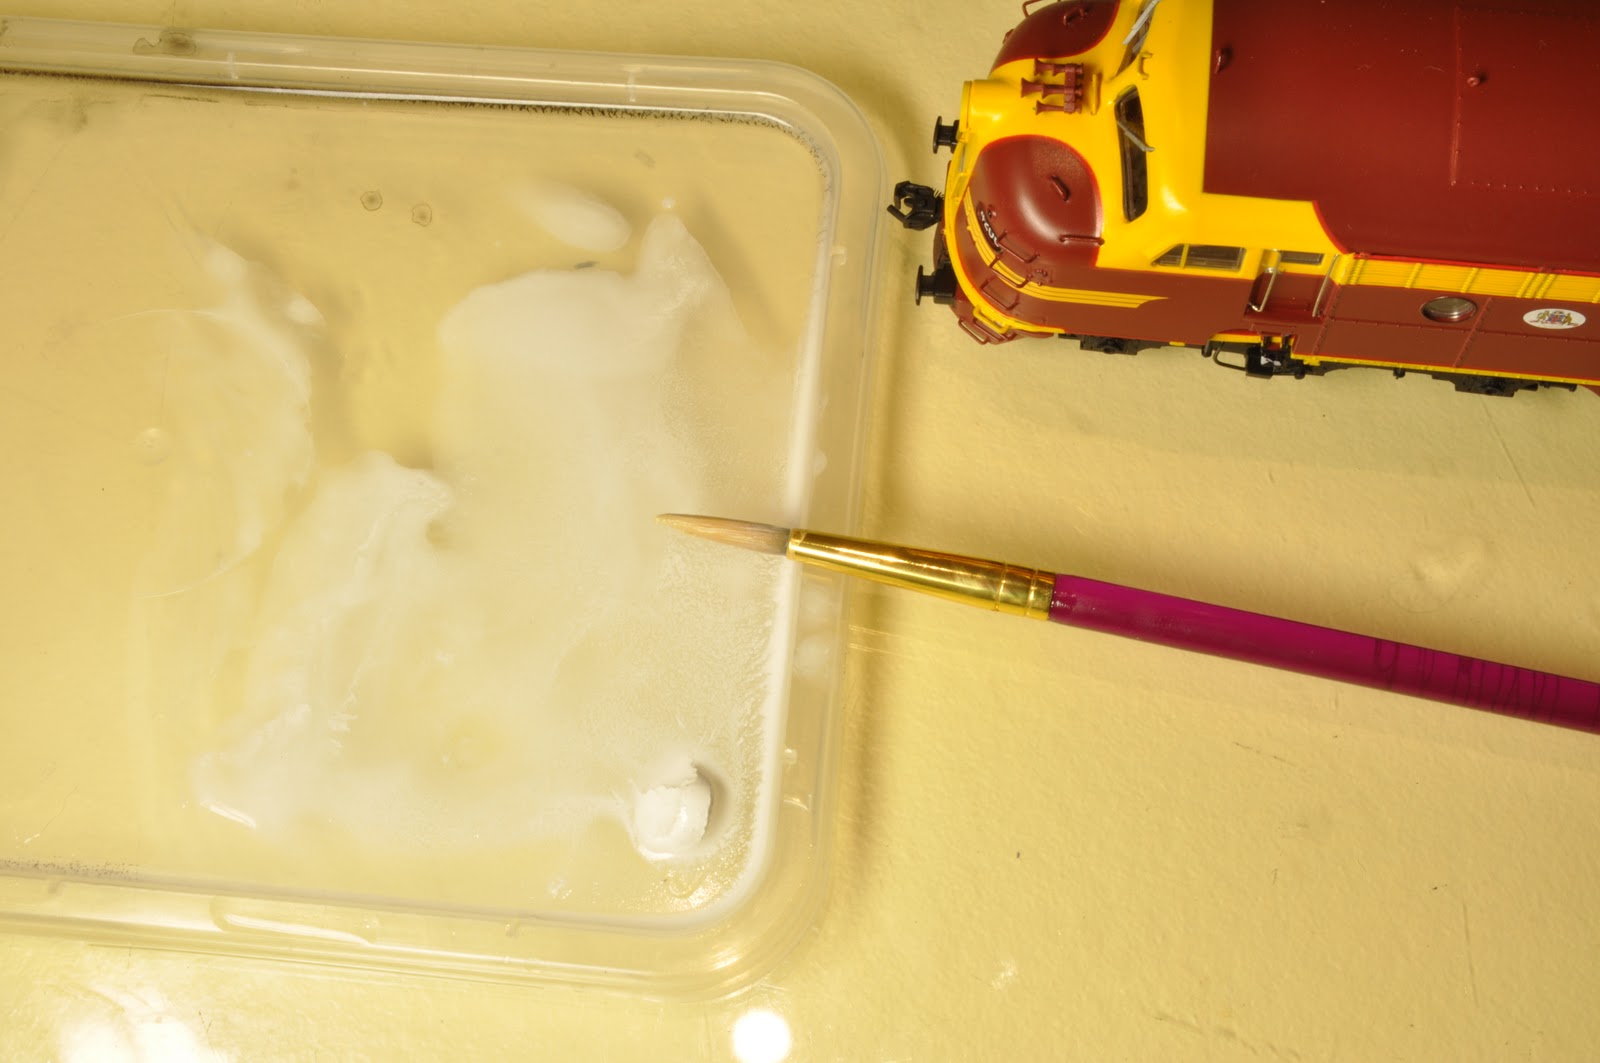
I only used two colours for the NR and 42, Ivory Black and Zinc White. I mix the paints with microscale decal solution to a tea like mixture. For the NR the first step is to mix up a weak black wash on a plastic pallet. I use the lid of a Chinese container. Good excuse to get Chinese for tea!


Apply the wash over the entire model. You may find it will 'pool' a little. These can be brushed out as it starts to dry. You will see it highlight the grooves and grilles on the loco. Depending on the consistency you mixed you may want to apply a second coat depending how weathered you want your loco.

To create stains and runs from vents etc, apply the black paint straight from the tube in small dabs with a small brush. See picture below. Work on small areas at a time. Then 'wet' a second small brush with microscale and drag the paint down the panel. Vary the length of the runs as well as paint consistency for affect. If you find you have it a little heavy simply thin it down with clean microscale. If you are unhappy with the result clean it down with a largish 'Wet' brush and start again.

One you are happy with your stains and washes, apply flat finish to the entire model to seal in your work. Next, using the air brush I over sprayed the roof and grilles with Floquil Weathered black. I also gave the bogies a hit with this as well, then blended in the stains and runs with Engine black. To finish of a little Floquil Grime along the lower sides to simulate dust etc. Again I gave the loco a second coat of flat finish to seal it all in. Clean the wheels and the NR is ready for service......Or looks as though it has for quite a while.


The 42 was done much the same. I wanted to create a faded affect for Tuscan 4206. The first wash was done using the Zinc White again mixed with with the microscale to a tea like mixture. Cover the entire model with the wash solution. You will see as it dries it has toned down the bright Tuscan paint.

Rain and weather would have washed the black exhaust residue down the sides of the loco, more heavily around and below the exhaust stacks and vents. This can be done with the same black wash method used on the NR. Before you do this you will need to flat finish the model other wise when you add the black to the white you will end up with a light grey wash. I really only done this black wash on the rear half of the loco leaving the nicely faded area around the nose and roof above the drivers cab.


I created fuel stains below the filler caps on the fuel tank the same way as the runs on the NR. If you want to 'sharpen' up the run, drag a small flat brush, with clean microscale, down either side of the run. Once you are happy you can again blend in the washes and stains with the airbrush weathering colours to finish off.


The affect is a little different from the norm but looks very good when finished. I have also tried these techniques with the steam engines. Using the white for water stains against the weathered black looks fantastic, and black runs on the Green tender sides is a good affect.  You can also create some great rust affects using Burnt Umber, Raw umber and Raw Sienna sponged on using a cosmetic sponge or create rust stains and runs using the same 'Run' technique described above (maybe another post). Have fun anyway.

If you are going to the Sydney show on the long weekend, I will be there with the Coffs Harbour club layout. Drop by and say Gday and see them first hand. I will have the goods wagons that I detailed in the earlier posts as well.
If you can't make it to Liverpool here is a short video of the locos on the layout at the Caulfield Exhibition.

Sunday, September 5, 2010

Loco Week........A Few Weeks Late!

Wow! I can't believe its been three weeks since my last post. Its been frantic here the past couple weeks. This post was intended to be posted before our trip to Melbourne, though the long list of jobs was not completed till the afternoon before we left.

As I mentioned in the previous post, I dedicated the last week to getting some locos ready for the exhibition. I have been doing some decoder installs and weathering for some of the guys in the group, I think its because I have the best eyes!. On the list of jobs I needed to complete for the show, was to install Tsunami Decoders in 5 or so locos, four of these for a Club Member. These being 2 x NR's, 2 x 42's  and an old brass American Union Terrific Bullmoose for myself to use in the American session. As most of our locos are used on the exhibition layout, it has been a high priority to get the best sound quality and volume from the locos. I have found that most of the NSW locos have no room for decent speakers and modifications are needed to fit the speakers in. We have had great success with the 'High Bass' style speakers. Below is a description of the installation in both the NEW Austrains NR and the Trainorama 42 Class. I will describe the weathering process for both using the Water soluble Oil Colours in the next post.

Lets look at the NR first. As mentioned you will need the new version NR.....The ones with working ditch lights. I removed the factory circuit board from the loco leaving the lights in place. I also removed the switches and wiring that control the lighting as these will be controlled using the decoders functions. The decoder used is the TSU-AT1000 (AT for Atlas Version) FDL16. The AT decoders are a bit longer, and are also a bit thinner than the standard Tsunami. It is also not shrink wrapped. They are designed for 'Plug And Play' sound. Wire in the decoder following the wiring colour codes as per the installation instructions. I wired the Front light (white wire) to both the front lights and to the rear RED markers. Then, the rear light (yellow wire) to the rear light, and also to the front RED markers. Each of the decoders function wires can be run to the Ditch lights. Don't forget to wire in the dropping resistors. This will allow the rear red markers to come on when going forward and visa versa when in reverse. The functions on the controller control the ditch lights.
Next, remove the fuel tank cover from under the loco. You no doubt have already done this to remove the light switches. You will see that there is an ideal place for a speaker. The 23mm square High Bass speaker will fit perfectly between the inner sides of the tank. For best results you will need to create a completely sealed speaker box. Run the wires from the decoders speaker terminals, making sure you remember witch one is the positive + wire, and pass them down through the holes in the floor. Next, I sealed these up with some small scraps of 1mm styrene glued over the holes using 5 minute aryldite. 
Now, Solder on the wires to the speaker. The speaker should have a red mark near one of the terminals. This is the + Positive terminal. Glue the speaker in the centre of the tank. Each side of the speaker can now be filled with appropriate sized 1mm styrene making an air tight speaker box. You may need to glue up the small mounting holes in the speaker as well. See Below...... 
  
Speaker mounted in fuel tank with styrene covers glued in place.

AT-1000 FDL16 wired in place

Now you will need to Drill a hole in the Fuel tank cover. I used a 22 mm timber speed bore bit in the cordless drill with the tank carefully clamped in the vise with a couple rags to protect the sides of the tank. Re fit the tank cover and body and your right to go.
Completed speaker mounted in the fuel tank

Now for the 42. These needing a few more modifications compared to the NR. Firstly, Remove everything from the chassis, Circuit Board, Motor, Lights, Bogie's etc. The speaker used for the install is the 28mm High Bass speaker with speaker box from the same manufacturer. The speaker with box will need to be sunk into the chassis of the loco. You will need to remove about 7mm from the rear of the chassis as shown below. This was done by clamping the chassis in the vise and making several cuts with the hack saw about the length of the speaker, then snapping off the sections with a small pair of long nose pliers. It can then be cleaned up with a file. 
Image shows the Modified Chassis above and standard chassis Below.
When the speaker is mounted in the recess, the top worm gear covers for the bogie's will foul on the base of the speaker, I Fixed this by filling away the top of the covers level with the lowest step on the cover. See below.
Modified cover (right) showing removed material level with lowest step.
Wire up the speaker and glue into the speaker box making sure it will be air tight. Next round off the top outside edges of the speaker box as shown below. Be careful not to damage the speaker.
Speaker box with edges rounded off.
One other modification that is not really necessary is to open out the holes under the rear exhaust grilles to let a bit more of of the sound out. Simply remove the grilles and carefully cut out the holes using a scalpel blade. A bit of matt black paint to tidy up any white plastic showing. The fan assembly can be glued to the inside of the grilles and glued back to the body.
Exhaust grilles removed and holes opened out to let a bit more sound out.

You can now re fit everything back to the chassis and install the decoder. The standard Tsunami was used in this one, however I have used the AT version in these as well that are a bit easier to wire in. It may also be necessary to make a small batten across the speaker to Carry the wires from the rear light. This will prevent them from vibrating on the speaker.
The completed install. Note the batten for the rear light wires.
One other change I did make that I did not photograph in detail, was to have separate marker lights. At first I simply removed the main LED from the front light board and mount and wire a separate LED for the front light. The original light wiring can then be wired to the Decoders function terminal and the new LED wired to the front light wire (white). When I did the second one, I left the LED in place and cut the circuit board track to the main LED. The white wire can then be soldered directly to the back of the LED, using a resistor of course. Either method works fine. That's pretty much it. All the locos where then programmed using decoder pro. One of the biggest adjustments that can be made sound wise is to up the Bass level using the decoders built in Equalizer, vastly improving the bass level of the sound. I won't get into the programming as that would take a while. I'm sure you all know how to do this.........
That's all for now. Make sure you check back shortly for the weathering demo.

Saturday, August 7, 2010

Steady Progress

This is a little later than I would have hoped, however between work and house Reno's I have been making steady progress on the stock ready for Melbourne. The CW is just about finished. I just need to tone down the lettering and add a few final touches. Before the body was assembled the timber slats, sides & ends were painted a light grey base colour. Then, after all the slats were glued in place, I was able to add the internal cross bracing. These are made from North Yard 0.005" x 0.030" brass strip pre painted with Floquil Rust. Added also around this time was the coupler release bars. The sides and ends could then be Glued in place.
The horizontal steel bars on the ends were now installed. These could not be put in place earlier as they pass through the corner post that is part of the sides. I discarded the course plastic roof that comes with the kit and replaced the lower section with a piece of 0.010" styrene. Small angled blocks from scale 1" x 3" styrene along with a top runner make up supports for the top half of the roof. AR corrugated iron and a couple styrene battens completing the roof. I then weathered the model with various application of acrylics.
I ended up using the Bergs chassis sides. I also used the flat floor section, though the time it took me to file flat the raised plastic blocks that originally held the brake cylinder etc, would have been quicker to use a piece of styrene. I glue two centre sills, from I beam styrene, to the now flat floor. The ends cut down slightly to accommodate the KD boxes. The side frames also glued in place. I then proceeded to add all the brake detail to the same detail level as previously described in earlier posts along with RP25-88 wheels. The completed underfloor black etched and installed under the wagon. I have left this loose so i canload on some beasts at a later stage. The final weathering applied to the entire model the finish it off. The result i thought was very pleasing.
Must get to and make a diorama instead of a cardboard backdrop!

The KF was also painted and weathered. The decals were a pain to fit. I had some old decals inherited from a deceased estate that had gone hard and broke when slid from the paper. I managed to fit all the appropriate ones including the Capacity and Tare along with the Wagon number on the builders plate. I cheated a bit and used several numbers from Microscale UP loco decal sheet. I also fixed the Coupler release lever so it matched the prototype and added a couple tie down rings on the ends. The lever now hangs from underneath the wagon. Just needs a nice farm tractor to finish it off.

Along with the KF I put through the paint shop the ABV and a couple S and K wagons. I found on a Weathering Forum an article on using Windsor & Newtons Water Mixable Oil Colours for creating Washes, stains and rust. The paints are mixed with Micro Sol decal solution to whatever consistency is required for the job at hand. I Thought i would give it a go on the ABV and the S wagon. I might do a step by step on this technique in another post.

The DOT also found its way to the Paint shop. Like most weathering i do, I get carried away and they usually end up more weather beaten that originally envisaged. The Rust on the top was done using the Oil Colours but sponged on with a cosmetic sponge. Take my advise, ask permission before stealing the wife's!

Last week the postie delivered a big box full of Trainorama BWH/FWH wheat hoppers. These also I wanted weathered ready for Melbourne to make up my block wheat train to run behind the 42. I divided the 20 wagons into about three groups so as to achieve Light, Medium and Heavy weathering so as they didn't end up looking all the same. I added a couple BCH's and an FHG as well.
Above on top is the Medium, and below that the Heavy. I forgot to take a picture of the Light one!
The Heavy weathered BCH. I added weathering to the inside as i will have removable coal loads so i can run empties and fulls. And the FHG below with guard.


Just for an experiment i added some working markers to the rear of the FHG. 0.75mm fibre optics and a couple LED's powered from pickups on the bogie's makes all the difference.

Wagon week was this week, Next week is Loco week. I have a couple decoder installs to do as well as a few repairs and more weathering. As usual not enough time in the day. Sorry for the stack of Photos. They do I feel tell a thousand words. I will try and do a post about the Loco work before my Melbourne trip. If not if you attend the show, drop by the layout and say gday.

Monday, July 19, 2010

A little Quiet. A little Busy

The modelling front has been a little Quiet now that the rain has gone, Though I have been very busy with the house extensions. While most of the works have been concentrated on the boring side of it, the single garage on the eastern side of the house, I was able to do a bit toward the train room. I may have mentioned earlier that the train room will be underneath the back part of the house as well as an area extending out from the back with its own roof. The six steel posts, pictured below, will be replaced by four posts that supports a steel 'C' section beam so as to eliminate some of the posts within the room. I have to put up with two of them but!
This is the back of the shack showing the six existing posts. The length between outside posts is 9.3m. The room extends out 2.6m from the posts and under the house 3.2m to the brick piers giving me a train room size about 9m x 6m. Still not big enough!
I have spent the last week setting out and digging the four new pier holes ready for concrete, hopefully this week. As most of the details of the building work needed to be engineered for council, it seems to me that they have over engineered everything. The holes are 600 x 600 x 800mm deep. Two of these being 400mm below the slab level. A metre deep of digging!
The steel beam has also arrived. Just need the rain to stay away now.
The view from next door showing the pier holes ready for council inspection. The formed hole closest to us is for the upper house extension part.

Here is the steel beam ready for installation. Yes, that is a 66 Mustang. Father In laws.


While I have been busy with the house, I was still able to find time to do some modelling.....not much but. The BCW's have been shelved again as i am still waiting for the resins etc for the floor. I have been working on, for some time, a near enough KF flat wagon. I used an Austrains K wagon and took to it with a razor saw. After removing the unwanted sides, I carefully removed all of the heads of the rivet detail that would normally hold the side panels together on the prototype. I then drilled with a number 80 drill all the rivets that would be visible on the chassis. Then, I removed all traces of the angles and flat braces leaving the holes in the chassis sides in the correct location of the rivets. I extended the grooves in the timber floor so as they are visible on the side of the wagon. A small score using a fine razor saw is made along the sides and ends to show the bottom of the timber planks. The odd looking section and angle brackets behind the centre step was also fabricated from styrene. New centre sill and brake detail where then added under the car along with Brass brake detail etch for the hand brake lever. All the steps and grab irons removed earlier are put back in place.I should really make new steps from brass angle as per the prototype. I had also made coupler release bars, however after closer inspection of the photos (Day Of The Goods Train & AMRM June 2002) I have positioned them in the wrong way as the one in the photo hangs down under the coupler and up to the outside of the chassis on an angle. As usual RP25-88 wheels are fitted. After I fix the coupler release bars, I just need to add the timber sides to the top of the deck, A few tie down eye bolts and paint and weather the wagon.....Along with the other half finished projects building up on the work bench.
Here is the KF as of today. I have not fixed the Coupler bars yet.


Underside of KF showing brake detail.

Sunday, July 4, 2010

Stubborn Cows

Just can't seem to get these stubborn cows moving! The BCW's have come to a grinding halt. I have had to order stock to make up the external bracing. In the mean time I was able to assemble the sides and ends along with internal roof supports.


Assembled body waiting external bracing


New buffer beams were also constructed to give the appearance of the 'C' channel, again using various sized Styrene.


Detailed shots of new buffer beam.


While waiting for the brass stock for the BCW's, I have decided to make a start on a few other goods stock to hopefully have ready for Melbourne. I picked up a couple of the Infront Models Arnott's Biscuit Vans last year at the Sydney AMRA show. I wanted to add a bit of extra detail to these mainly in the form of brake rigging. This was the first time I have done this and subsequently learnt a bit along the way. James McInerney done a great article on the detailing of the four wheel S wagons in the Branchline Modeller Mags. This along with full size pictures I took while at Glenreagh helped immensely. I cheated a little and used the S wagon super detail etch from Keiran Ryan Models. I also used a few odd castings from the Branchline modeller S wagon super detail Kit. I think the end result will look fine once i paint it.


Two shots showing the ABV with added brake gear. Pretty much ready for paint.


Another small project started a few weeks back is a four wheel 1948 CW cattle wagon. This will be the original unstrengthened version. The basis for the model was the bergs CW. I removed most of the plastic timber slats from both sides and ends using a bench linisher. I was a little impatient when I tried to hand file them off, but if you take your time the linisher is much faster. The remainder of the slats along with the two extra vertical braces are then removed with a scalpel. I also wanted to achieve a see through look around the door. This was done with a razor saw, small drills and dental pick. I have not finished this part yet. The slats will be replace with scale timber. The original bergs side left, and the modified on the right.

The up close shot of the wagon side with all traces of cladding removed.
I have started on removing the areas around the doors.

Another small project started quite a while back is an Ian Lindsay Models BWF. Basically straight from the box with a little brake details, Shoes pipes etc.

Underside of the BWF. I have added the brake shoes to only one bogie at this stage.


I have just about finished the DOT mentioned in a previous post. Just about all the decals are on the painted model. A few added extras to put on, then weathering to finish off.

Behind the scenes a mate of mine, Andrew Lee, has been working on an LWW well wagon. I think there was only a few of these ever made. He is a whiz with Auto Cad and has put together a very detailed brass etch. He had two etches done, He had build the first and he had me do the second. Its starting to look very good. Originally he wanted it to cast, however because of its extremely thin sides it was almost impossible. He is hoping to revise the etch to be in kit form as it currently would be a little difficult for the average modeller to assemble.

You can almost read the Builders plate!

That's all for now. I will keep working on the stock and keep you all posted.