I hope its not just me that seems to start a different project before the one before is finished! Whether it be because you run out of materials, loose interest, or it gets put into the too hard basket. Again I have pushed aside what I had started a few weeks back and dragged out a new project. Actually this one was put into the too hard basket 6 months ago after having trouble with the decoder. As the Sydney Exhibition approaches rapidly, I thought I would try and get this project back on track and finished so I can run it on the layout at the show.
I was given a couple of Easy Kits 19 class kits to build for a club member. One of which would be for myself. As usual I could not simply build the kit straight from the box. I thought I would have a go at fitting sound to both the loco's. The 19 class kits from the box are driven with a can motor mounted in the tender and shaft drive through a gearbox to the rear diver. Fitting the sound decoder and speaker to the tender, like most other loco's, was not possible. If I was able to mount the motor inside the boiler of the loco and drive through a taller gearbox this would leave a small space inside the tender for the decoder and speaker.
I had a couple gearboxes spare from two DJH 50 class kits (another project). With a few modifications to the chassis and boiler of the 19 class, the gearbox fits perfectly with the input shaft lining up dead centre inside the boiler. I ordered a couple 10mm round can motors from the UK, along with the new gearboxes for the 50 classes, that fitted neatly inside the boiler held in place with a couple bits of blue tack. The decoder is a SoundTraxx Tsunami 750 C class mounted on top of a 15mm x 25mm speaker. I later glued the decoder to a 2 dollar coin as a heat sink. I also added a cam operated chuff to the rear loco driving wheel and extra pickups to the tender as well as the usual working headlight. The result was worth the effort. The only downfall is that once the loco is finished it is almost impossible to get to the motor. I have written a detailed article on this conversion for AMRM. At present both the loco's and running but are not finished. All that I need to do is finish off the detail work and I can send them to the paint shop. That's this weeks Job. Once the loco's are finished I can take further photos and submit the article to the magazine. Keep your eye out.
Here is a sneak preview of the pics.
 |
| View from the underside showing modifications made to the boiler and chassis. |
 |
| Tsunami decoder mounted on top of speaker. I later substituted the doubble sided tape for a 2 dollar coin for heat sink. |
 |
| The above two photos show both tender variants with extra pickups added. |
 |
| The almost completed loco with new gearbox installed. |
I promised in the last post I would try and show how to do the weathering using the Oil colours. I may have mentioned that these are Water Mixable Oil Colours from Windsor & Newtons. Below is the process on the NR and 42.
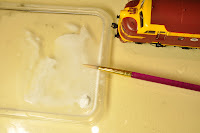
I only used two colours for the NR and 42, Ivory Black and Zinc White. I mix the paints with microscale decal solution to a tea like mixture. For the NR the first step is to mix up a weak black wash on a plastic pallet. I use the lid of a Chinese container. Good excuse to get Chinese for tea!
Apply the wash over the entire model. You may find it will 'pool' a little. These can be brushed out as it starts to dry. You will see it highlight the grooves and grilles on the loco. Depending on the consistency you mixed you may want to apply a second coat depending how weathered you want your loco.
To create stains and runs from vents etc, apply the black paint straight from the tube in small dabs with a small brush. See picture below. Work on small areas at a time. Then 'wet' a second small brush with microscale and drag the paint down the panel. Vary the length of the runs as well as paint consistency for affect. If you find you have it a little heavy simply thin it down with clean microscale. If you are unhappy with the result clean it down with a largish 'Wet' brush and start again.
One you are happy with your stains and washes, apply flat finish to the entire model to seal in your work. Next, using the air brush I over sprayed the roof and grilles with Floquil Weathered black. I also gave the bogies a hit with this as well, then blended in the stains and runs with Engine black. To finish of a little Floquil Grime along the lower sides to simulate dust etc. Again I gave the loco a second coat of flat finish to seal it all in. Clean the wheels and the NR is ready for service......Or looks as though it has for quite a while.
The 42 was done much the same. I wanted to create a faded affect for Tuscan 4206. The first wash was done using the Zinc White again mixed with with the microscale to a tea like mixture. Cover the entire model with the wash solution. You will see as it dries it has toned down the bright Tuscan paint.
Rain and weather would have washed the black exhaust residue down the sides of the loco, more heavily around and below the exhaust stacks and vents. This can be done with the same black wash method used on the NR. Before you do this you will need to flat finish the model other wise when you add the black to the white you will end up with a light grey wash. I really only done this black wash on the rear half of the loco leaving the nicely faded area around the nose and roof above the drivers cab.
I created fuel stains below the filler caps on the fuel tank the same way as the runs on the NR. If you want to 'sharpen' up the run, drag a small flat brush, with clean microscale, down either side of the run. Once you are happy you can again blend in the washes and stains with the airbrush weathering colours to finish off.
The affect is a little different from the norm but looks very good when finished. I have also tried these techniques with the steam engines. Using the white for water stains against the weathered black looks fantastic, and black runs on the Green tender sides is a good affect. You can also create some great rust affects using Burnt Umber, Raw umber and Raw Sienna sponged on using a cosmetic sponge or create rust stains and runs using the same 'Run' technique described above (maybe another post). Have fun anyway.
If you are going to the Sydney show on the long weekend, I will be there with the Coffs Harbour club layout. Drop by and say Gday and see them first hand. I will have the goods wagons that I detailed in the earlier posts as well.
If you can't make it to Liverpool here is a short video of the locos on the layout at the Caulfield Exhibition.


