Last Week I decided to pack it all up and move house! It’s the end. But where there is an end there is a new beginning. Yep I have finally moved into my long awaited railway room. I packed up all my modelling table and railway gear and moved it down stairs away from the hands of my 4 year old!
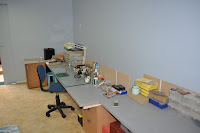
Before I could actually move in I had to erect some new benches for the modelling table. I really wanted a custom laminex bench like a kitchen but when I got the quote back I nearly fell over. It was $900 dollars for a 4.8m x 750mm laminex bench. Just ridiculous. I was hoping to have the bench the same distance out from the wall as the layout bench work under Muswellbrook yard. I could mount a fluoro light behind the lower level fascia to light the bench. While at Bunning’s I found some 2.4m x 600mm laminex bench tops for a hundred bucks. A bargain I recon. OK so they are probably not the quality of proper Laminex but the price was right. The 600mm width proved an issue but was willing to work something out so, I headed home with two.
In order to make sure I have the bench at the right height I proceeded to mark on the wall the roadbed height for each of the two layout levels along with the bench height that will be underneath. I marked these at each of the wall stud locations that I have previously marked on the floor before the gyprock was installed. I soon found a major flaw in my design. With the lower level bench at 1100mm from the floor and my work bench at a normal 750mm, it only left me 300mm to work under when I allow the 50mm for the fascia. I tend to work on the front half of the bench but I think I would hit my head on the fascia. Because I am so greedy and want just about every bit of the wall room as layout it leaves me no other place to put the bench. I came up with a silly idea to mount each of the two benches on sliding drawer runners. Another trip to Bunning’s. This is the result.
 |
| If you look carefully you can see the layout height marks on the back wall. |
These runners will handle 25kg each and will slide out 450mm. I allowed three for each of the 2.4 bench tops. I also added at the back of the bench a timber wall to stop stuff being accidentally pushed off the back. Once the layout is built I can simply slide out the bench when I need to do some modelling. I can still mount the fluoro in under the lower level bench work behind the fascia to light the work area. When not in use it can be slid under the bench work and covered with layout curtain out of sight. I have also made the bench 150mm off the wall. This brings the front of the bench level with the front of the layout.
I am slowly sorting out all the bits and pieces into small containers and labelled so they are easy located. I still need to make up something for all my small tools so they too are easy accessible.
I also needed a place for all my unbuilt kits, new stuff, Boxes and generally anything I want to hide from the missus, I needed some cupboards. Back to Bunning’s......I’m glad it’s only 5 minutes away. I bought one of their flat pack kitchen cupboard units. 800mm wide, 900 high, 400 deep. Just a $120. Fits the bill nicely. I will actually end up getting a couple more of these as I progress.
On the modelling front, once the table was set up I got straight back to work. The 57 has come to a screeching Halt. I was able to get it running with the decoder but soon found that the K class decoder has a distinct fourth chuff beat even though I have the 6 lobe cam disk. I emailed Gerry Hopkins who advised to use a logging decoder as it has a three cylinder chuff for shays etc. Just need to wait till it turns up.
Late last year I bought two of Michael McCormack’s LFX Dogbox Kits. I have had a brainwave that I might get in and get these built for the Epping Exhibition in June as I will be helping a mate exhibit his Layout. Probably a long shot but will give it a go. Yep, starting another project before finishing others. I decided to start with the bogie's. It’s quite intimidating when you open the box of one of these kits as there are probably more parts in these kits than in my Mini cooper S! You soon realise what you are paying for. There are many hand crafted and truly mouth wateringly superb urethane and brass castings along with several very fine etches, one of which are for the 2SB Bogie's. The kits also come with very detailed instructions on CD. Every single step of construction is detailed with precise instructions and tips along with a photograph for each step. The instructions alone at first glance can be quite daunting. However as I assembled each of the two bogie's I found that together with these detailed instructions and simply perfect castings and etches they fell together with no problem and actually quite easy, just a little fiddly. After 15 hours here is the result.
I asked Mike at the Sydney show last year if there was anything out of place or incorrect with these kits and he assured me they are close to perfect. I believe him. I still have a few small details to add. I have also built these to suit Hook draw gear. (They can be built for KD Couplers). They are that good they deserve the right couplings! Going to start on the body next.
If any of you guys want some simply superior hand crafted models forget about the price and get onto Mike and order a couple. You will be amazed at these fine Models. Gee I wonder if I get a commission for the advertising!
I have also been doing a little more for our AndIan models projects. The final etches turned up during the week for 40 or so each of our two and three lever frames. The instructions have been written and we are waiting on the styrene for the concrete platform. We hope to have these ready during April and will have some with me at the Brisbane show if anyone wants some. We still need to do some final work for the compensators etc. They will follow shortly after.
On the bottom of the etch we added the first sample of our four wheel water gin underframe. These tanks were mounted on a 10’ wheelbase steel S wagon underframe. There were a number of variations to these underframes. Of the visible variations, the most obvious is the number of gussets above the spring shackles, which vary from a single T shaped Gusset to two or three simple plate gussets. In addition, some underframes were strengthened by adding a plate under the solebar. The kit will cater for double gusset variety, with the option of building it with or without the strengthening plate. Other variations which are not covered in this kit are the W-irons, some underframe’s having rounded corners, detail differences in brake gear and of course different pattern wheels. The etch at this stage is for just the underframe as we will possibly have these available as a separate item and could be used under another project later on. A separate etch will be done for the Water gin components. I can honestly say that the sample looks fabulous. It has all the cross members, braces etc. along with all the brake shoe and rigging detail. There are a few small issues but you getting the general idea.
The BLV is pretty much ready to be cast. The new underframe is back from the printers and it too after priming will be ready to cast. Hope to have these for Epping. AndIan Models will have a small stand and will have LWW’s, Lever frames and BLV’s available. Very exciting. I will have another AndIan Models bulletin for those who are on the email list in the coming weeks.
Ian


Congrats Ian on moving in. Had hoped to be there myself but a fair way off yet.
ReplyDeleteBogies and underframe look superb, very nice work. I have one of Mikes LFX's and look forward to making a start.
Great work Ian. I myself have just picked up an LFX too...truly an impressive kit.
ReplyDeleteThat underframe would be a great modification for all those S wagons out there ;) You'd sell hundreds of em!
Cheers,
Brendan
When can I get em! And can you do em with Bill Bedford Suspension? They look fantastic guys!!
ReplyDeleteCongratulations on moving house! Impressive that you got to work on remodelling straight away.
ReplyDeleteNice work Ian, looking forward to seeing a finished MMM 'doggy'! The differences in the standard 18ft steel underframes (as what you have referred to as 'S truck underframes' were officially known) aren't random, they represent running changes in the various batches. The full story is covered in Craig Warton's articles 'S, S and S' in AMRM Issues 191 and 192 (April and June 1995). If you haven't got those issues, we'd be happy to sell them to you! ;)
ReplyDeleteIan, I'm not sure what to comment on first!!!! The train room leaves me GREEN, the brass etch leaves me salivating, and the thought of having one or two BLV's...unreal, really some great work, congrats, and well done. Put me down for a couple of theBLV's, and the underframes also, great stuff!
ReplyDeleteThanks guys for all the great comments. Its great to here we are not waisting time producing these type of models.
ReplyDeleteJames, I do have Craigs article but its one of things I must read fully.
Andrew, Excuse my ignorance, but can you tell me more about Bill Bedford. He didn't design the Bedford van did he?....!
Ian,
ReplyDeleteHere is the guff, I think you will find it most interesting and would be massive improvement in tracking.
http://www.clag.org.uk/bb-w-irons.html
Ian,
ReplyDeleteAs a P87 modeller, I concur with Andrew Campbell's comments above, even if the CSB type springing was included as an option?, the tabs to hold the spring wire could be readily added to the main solebar etch either side of the W iron and would be hidden from the outside by what looks to be a decorative solebar PFC web etch your using.
With this underframe your proposing, Now all we need is a rapid prototyped 'S' truck body with all the previous mistakes corrected, namely the door width.....any thoughts?
Looks great, looking forward to further progress with this as I feel the options that this underframe could be used for will be of great value and assitance to modellers.
Regards,
Tom.
Your new place looks good. Thank you for sharing it to your avid readers.
ReplyDeleteLoved rreading this thanks
ReplyDelete