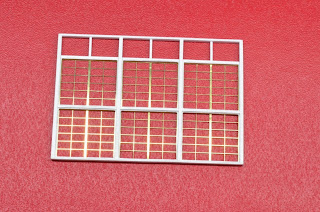
I needed to make five sets of 24' wide frames that hold two rows of the etches for the actual window frames. I knew that scratch building all five would be very time consuming so decided to see if I could cast them in Urethane. I could also supply my mate Adam with some for his Roundhouse as well and of course anyone else who wanted them. The frames not only needed to be correct in size but more importantly be able to accept the etches.
I begun by selecting the correct scale size styrene for each of the timbers. The 4 main posts sat directly on top of the wall and each of the windows sills were rebated into them. Using an engineers square, I scribed a vertical line into a 1mm thick sheet of Colourbond. Just so happened to be able to get that from Work. The MEK affected styrene will not easily stick to the steel sheet allowing easy removal of the completed frame.
I started by laying the first post along this line and held it in place with a couple bits of tape. The plans show these posts as 12"x 8" hardwood. As each of the frames will be butted together I made these from 6"x 8" giving the required 12" thick post when finished. Next was to position the lower 4"x 10" bottom sill along the lower edge of the Colourbond gluing it to the corner post. Using the window etch as a guide I glued the centre 6"x 8" post to the lower sill giving the etch just a mick hair of clearance. This should compensate for any variances in the etches and shrinkage of the casting. Using the same technique as described above, I proceeded to add the remaining two posts, centre 4"x 8" rails/sill and Top 4" x 6" rails.
Although Muswellbrook does not have any louvers above the windows like Cowra's, I added spaces for the these to the frames as well. I plan to have Andrew do a 3D print of a louver section that can be simply cast in urethane and inserted into the frame. I will just be cladding over the frame with the Corrugated iron.
To hold the etches in place, 0.020" square styrene strips are glued around the inside face of each of the frame openings. This also acts as the beading that would have held the frames on the real thing. A small piece of the 1mm Colourbond was used to set the correct distance in from the back face for the square beading. The 0.020" looked a bit bulky so thinned these slightly by scaping the surface with a scalpel blade. When the etches are inserted from the back another piece of the square styrene is glued down the centre of the etched window frame. The lower sill was also tapered away at the front edge as per the drawings. I was now able to cast the completed frame.
The below photos show the second cast frame. I destroyed the first one trying to work out how to remove it from the mould. If you look closely you can see the 0.010" styrene beading that holds the etches in place.
And here is the completed frame with etches inserted from the back. With all the etches glued in place I can airbrush the whole thing before adding the clear plastic for the window glass.
Stay Tuned.
Ian
Working Bee on FreeMo Modules
-
Monday (Public Holiday) last week was the scheduled working bee for 8 Div 1
guys at the Superintendent’s place with a 9:30am start, to work on the Div
1 ...
6 days ago


Nice work as usual Ian
ReplyDeleteIan
ReplyDeleteI have started my roundhouse & used measurements that I have gleaned from the plan that Ray had listed in your link. I am all but finished the internal trusses all done in timber, a bit of a challenge but worth it.
Today I worked on the brick side of the permanent wall, next step is the rear wall. As my Roundhouse has 80ft sides with similar angles having done the measurements the window spacings rather than the 24foot as shown in the MBK & you model, I have found my one has 25foot spacings, not much difference at all.
The thing that I can not find though with the large roundhouses with the 80foot sides/depth is photo's of the rear wall to see whether they had louvers or not, I do not recollect what 1 shed at Enfield had, nor the others of the same. The only remaining ones are Junee & Glbn, Junee is completely different though.
The crux then is that I would certainly be interested in the windows you are doing & would like to have 8 of them if possible. The aspect of the louvers is no issue & I can add them or not, although would you consider doing at least one set of louvers to go with each frame?
As for the slight difference in size, easy to add an extra piece of timber to the sides to cover that need.
Anyway, well done with your work.
very good.excellent work.
ReplyDeleteThis is Very very nice article. Everyone should read. Thanks for sharing and I found it very helpful. Don't miss WORLD'S BEST MonsterTruckDerbyStunts
ReplyDeleteI will recommend anyone looking for Business loan to Le_Meridian they helped me with Four Million USD loan to startup my Quilting business and it's was fast When obtaining a loan from them it was surprising at how easy they were to work with. They can finance up to the amount of $500,000.000.00 (Five Hundred Million Dollars) in any region of the world as long as there 1.9% ROI can be guaranteed on the projects.The process was fast and secure. It was definitely a positive experience.Avoid scammers on here and contact Le_Meridian Funding Service On. lfdsloans@lemeridianfds.com / lfdsloans@outlook.com. WhatsApp...+ 19893943740. if you looking for business loan.
ReplyDelete