Saturday, November 2, 2013

Muswellbrook Roundhouse - Pt. 4 Trusses

One of the best things I have found by having this blog, and I am sure that other blogger's will agree, is the amount of information that seems to come to light by fellow readers. Most of the early info I have gathered for Muswellbrook RH has been from field trips and very limited photographs. Although I was only able to measure accurately the rear brick wall section, all the other areas of the RH to be built would be from either guess work or trying to scale from poor black and white photos. One would then have to be happy with the 'near enough' result and hope that you don't get the "It was never like that" comments.

Soon after my first posting of the RH construction, I was kindly offered by fellow blog follower and Modeller Phil Colins, a full set of plans for Parks Roundhouse. Parks was, as shown from the plans, virtually exactly the same as Muswellbrook. Actually the plans state change dates for Muswellbrook. Along with the plans were a disk with numerous colour photos of the RH and service facilities. Wow! Its the sort of stuff you just dream about.......Well me anyhow. And only last week another exciting email from John Proctor (another follower), appeared with more photos showing the exposed roof trusses during its dismantling stage.  With Phil and Johns kind permission I will share some of these as the RH model progresses. Thanks again to you both.

 Both the above sets of info have been invaluable for the next stage of the RH construction. Originally I was going to copy the roof trusses from the Plans from Ray Pilgrims link and modify them slightly to resemble a close enough Muswellbrook roof profile. However with a full set of plans and detailed photos I could construct almost exact replicas of the trusses. I do say almost as I have steered away from the anal detail by leaving off the nut bolt washer castings etc. The plans show a much more complicated set of roof trusses and the time taken to build just half of them is getting a little lengthy....Yep, I'm over it!

Although I constructed the rear wall from Urethane castings I wanted the character of an old RH and felt that a timber construction was appropriate to achieve this. The inside of the rear walls will hardly bee seen from the front looking in and when weathered a brown black should blend in OK.
A list of all the required timber sizes was made up and a stock take of on hand timber was compiled. I am using mostly Capler timber purchased from Gwydir Valley and Model Railroad Craftsmen with a few in stock lengths of Northeastern. All the timber was pre stained a stick at a time using the techniques described In Garry's Modelfx blog using the Minwax stains firstly with the Classic Grey, then with the Ebony. I added a slight brown tinge to them with diluted Feast Watson Brown Japan stain. In hindsight I could have skipped the classic grey step as the coatings of black and brown seemed to covered most of this up. I made a tray at work to keep all the appropriate lengths in order and to make selection easy.


The RH roof is made up of three different trusses. The main truss runs right from the front to the back and is positioned over the centre of each of the dividing stalls sitting atop the two runs of bearers supported by the main posts. The truss also sits on top of the rear wall posts. At the front, and in between these main trusses are the inner intermediate trusses. These sit on top of the bearers that span between the main posts. At the rear are two sets of rear intermediate trusses. These span from the centre bearer to the rear centre posts. The below photo of the plan shows their position more clearly.


Three separate jigs were made to construct each of the three styles of truss. These were made using sheets of 5mm styrene with the outline of the truss scribed in using a square, scale ruler and scalpel blade. Then gluing with MEK small sections of strip styrene either side of the scale sized timbers until the completed truss jig was made. Each of the timbers were then cut to length and glued together with white glue to make up the truss. I did however find that the pre stained timber did not allow the glue to penetrate and hold real well. Some pieces came apart when removing them from the jig. I simple re glued these into position using some thick CA. I also decided to go along and strengthen the joints with the CA to ensure it does not all fall apart at a later date. I still think the effort of pre staining is worth it.
Here are photos of the plan showing the three trusses and the first set of modelled trusses in and out of the jig. Note the unique vented ridge at the peak of the roof that will be correctly modelled.


And here is a shot of Muswellbrooks exposed roof trusses. With thanks again to John Proctor for the use of this photo.


While the slow process of the truss construction continued, I set about setting out the bearers over the drawing I'd done on the temporary base ready for the trusses. The 12"x8" bearers were cut and laid over the arced lines on both the front and centre posts positions. These were held in place with masking tape while the glue dried. Small pieces of paper were layed under the joints to prevent the whole thing sticking to the base. After the glue dried I drilled and pinned, using brass wire, these at the joints leaving the pin above and below the bearer by about 3mm. This will alow me to insert both the truss, and at a later date, the posts to the brass pins making a realy strong joint. The rear of the truss was also drilled and pinned so as they can be possitioned into holes in the rear wall posts. I will not be glueing these ones so I can hopfully remove all the roof section leaving the rear wall in place. The intermediate trusses will only be glued into possition. No pins required.


   Once I have most of the roof trusses fixed in position, I will need to relocate it all to its possition on the layout so as I can postion the posts on top of the styrene formwork for the RH floor. I will be starting some benchwork shortly so stayed tuned for that.

Till next time.


Sunday, October 13, 2013

Muswellbrook Roundhouse - Pt.3 - Windows

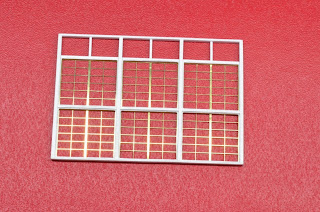
I needed to make five sets of 24' wide frames that hold two rows of the etches for the actual window frames. I knew that scratch building all five would be very time consuming so decided to see if I could cast them in Urethane. I could also supply my mate Adam with some for his Roundhouse as well and of course anyone else who wanted them. The frames not only needed to be correct in size but more importantly be able to accept the etches.

I begun by selecting the correct scale size styrene for each of the timbers. The 4 main posts sat directly on top of the wall and each of the windows sills were rebated into them. Using an engineers square, I scribed a vertical line into a 1mm thick sheet of Colourbond. Just so happened to be able to get that from Work. The MEK affected styrene will not easily stick to the steel sheet allowing easy removal of the completed frame.
I started by laying the first post along this line and held it in place with a couple bits of tape. The plans show these posts as 12"x 8" hardwood. As each of the frames will be butted together I made these from 6"x 8" giving the required 12" thick post when finished. Next was to position the lower 4"x 10" bottom sill along the lower edge of the Colourbond gluing it to the corner post. Using the window etch as a guide I glued the centre 6"x 8" post to the lower sill giving the etch just a mick hair of clearance. This should compensate for any variances in the etches and shrinkage of the casting. Using the same technique as described above, I proceeded to add the remaining two posts, centre 4"x 8" rails/sill and Top 4" x 6" rails.
Although Muswellbrook does not have any louvers above the windows like Cowra's, I added spaces for the these to the frames as well. I plan to have Andrew do a 3D print of a louver section that can be simply cast in urethane and inserted into the frame. I will just be cladding over the frame with the Corrugated iron.
To hold the etches in place, 0.020" square styrene strips are glued around the inside face of each of the frame openings. This also acts as the beading that would have held the frames on the real thing. A small piece of the 1mm Colourbond was used to set the correct distance in from the back face for the square beading. The 0.020" looked a bit bulky so thinned these slightly by scaping the surface with a scalpel blade. When the etches are inserted from the back another piece of the square styrene is glued down the centre of the etched window frame. The lower sill was also tapered away at the front edge as per the drawings. I was now able to cast the completed frame.

The below photos show the second cast frame. I destroyed the first one trying to work out how to remove it from the mould. If you look closely you can see the 0.010" styrene beading that holds the etches in place.


And here is the completed frame with etches inserted from the back. With all the etches glued in place I can airbrush the whole thing before adding the clear plastic for the window glass.


Stay Tuned.

Ian


Monday, September 30, 2013

Muswellbrook Roundhouse pt.2 - Rear Wall

The rear brick wall has five straight double brick sections 5' high that wrap around the back of the roundhouse. The distance determined during the research process revealed that they are 24' long centre to centre. The fifth stall, closest to the road, in the following photo shows that the wall extended out past the corner post by three feet from the centreline of the corner post. You can see the timber stud for the corner of the wall set back this distance. The stud would have attached to the corner post.

 
I did not have evidence of the corner wall of stall no.1, as at present they have removed the wall for easier access to the yard, so I decided to stop the wall flush with the outside face of the side wall. This will need to be extended 6" past the centreline of the corner post (half the distance of the corner post which were 12"x 8" hardwood).  
 
I started by cutting five styrene pieces the required length and height for each of the stalls. I added scale 8" to the height to allow for the concrete floor which I will pour with plaster level with the top of the rail. This was actually done on the prototype as well only the step down was done in the slab before the brick wall was constructed......A bit like a brick veneer house. Next was to laminate two long pieces of styrene to each side of these short pieced. The long lengths were divided up with the correct lengths of each of the stalls so I could scribe and slightly bend the styrene around the back wall. This would give me a gentle bend at each of the angle changes and make the whole thing nice and solid.
 
I lightly glued to the temporary timber base 5 pieced of 20mm square pine on the back side of the rear wall lines previously drawn and set back so the centre of the three styrene pieces (the short ones) was over the centre of the line. Once the glued had dried I could clamp and laminate with MEK each of the three pieces of styrene together.


I wanted to detail the inside of the shed slightly so anything that would stand out needed to be modelled. This included the access doors to the machine shop located behind the rear wall. The rear wall at Muswellbrook has had these access ways bricked in and the different colour bricks used makes them stand out like the proverbials. As can be seen in the lower photo the large double doors can be easily seen from the front of the shed.


Photo Courtesy of Graham Harvey from his Flikr Site.

 
I was able to measure these openings while at Muswellbrook so proceeded to transfer these to the wall section and cut these out down to the top of concrete level. I just so happened to have plastic double doors from an old kit that are a close match to the dimensions. Next was to laminate Slaters English Bond brick sheet to the front and back face of the styrene wall. This was done in long lengths so as to eliminate any unwanted joins.

The piers at the rear of the wall at each of the angle change positions were done by simply adding a second layer of brick sheet over the first. It scales out just about perfectly. Of course at the correct width measured from the prototype. The chamfered top edge was also modelled by gently filing along the outer face at about 45 degrees. At least the rain will run off!  Seen also is the styrene 'slab' for the machine shop. The use of styrene rather than the poured plaster was done as it will most probably be never seen.


To be able to accurately move the completed rear wall section to its new position on the layout, I added some brass pins to the underside of the wall in all the angle change positions and located right in the centre of the wall. Holes drilled in the timber base keeps it all in the correct location. When I move it to the layout I will lay the temporary sheet in the correct location and drill through the holes into the bench work. On the inside lower face I added two 8" x 6" styrene strips glued together. I will use this as 'formwork' for the slab. My idea will be to mask the painted wall and pour the slab level with the top of the styrene and railhead.
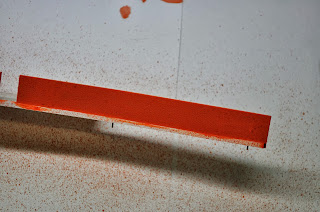
Next was to paint the wall. I have never been real confident at doing brickwork so was time to try a few ideas. I have to admit that the following technique was described to me by Peter Lewis of 'Time and Patients' that we have all admired at the shows. I applied by brush a base colour of Humbrol no.82 matt 'Orange Lining'. This a real orange colour but will tone down with following steps. Next was to add a 'splatter effect' using Humbrol no.100 'Red Brown', no.63 matt 'Sand' and no.33 Matt Black. This is done by slightly thinning the paint with Mineral Turps and using a stiff brush and a gauze or mesh strainer held over the top of the wall, and brushing the bristles on the top side of the gauze. This causes the paint to splatter in fine uneven and random spots over the brickwork. The slight thinning allows the paint to flow slightly and settle on the surface rather than landing and drying in fine spots. Using the paint in the order listed above gives a great effect. Finally, I gave the entire wall a wash of white (with just a small amount of black to turn it grey) Windsor and Newtons water soluble oil paint thinned to a tea like mixture with Isopropyl alcohol to give the appearance of the mortar between the bricks. I ran a cork block slightly soaked in alcohol over the surface just to take off a bit of the white from the face of the brick. I will also use some thinned black to add some grimy rain streaks also. The photos might explain all this dribble better.


The top edge will be painted with Floquil Concrete to finish it all off.

Till next time.


Saturday, September 28, 2013

Muswellbrook Roundhouse pt.1 - research.

As usual, I have delved into yet another project before finishing the previous. There is however a plausible excuse for this....and its the one I'm sticking to!

I have made a start on constructing the roundhouse for Muswellbrook. This is actually the first piece of construction commenced for the layout. So, here is the excuse......I was asked at the last New England convention about doing some etching for the rear wall section of an Anton's roundhouse Kit for a friend and fellow Blogger Adam Homer. A sample section of the rear wall from the kit was sent to me for measurement and inspection. The Anton's kit uses a cast polyurethane frame with clear acetate for the window glass that has lines marked with a black pen to represent the window frames. Apart from the wall section being totally out of square, The window glazing with its black lines just looked terrible!
Originally Andrew and I (AndIan Models) set about to make an etch that was able to be inserted into the Anton's frame, but after much deliberation it was agreed that if we were to spend the time on the etching artwork we may as well make them correct. After all, I was wanting similar etched window frames to the Cowra ones Adam wanted. So, a new wall section needed to be constructed to fit the correct frames.

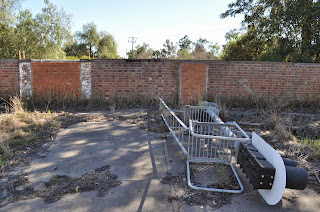
Fortunately for me, the rear brick wall section still exists at Muswellbrook along with the roundhouse floor and turntable. As Usual, Muswellbrook roundhouse was unique in many forms and I have never been able to get detailed plans of the roundhouse. Over several visits to Muswellbrook I was able to accurately measure the rear brick wall and roundhouse floor. The below three photos show the roundhouse floor and rear brick wall section still standing.


You can see in the lower photo that the stirrups atop the brick wall are still there. These held the base of the main posts that divide each of the window frame sections. There are three sections per stall. Some simple measuring revealed that the distance between the outer posts, or centreline dividing each stall, was 24'. Some time ago Ray Pilgrim 'Bylong Blog' posted a link to some roundhouse drawings along with a link to a flickr site with images of Cowra's Roundhouse. I soon realised that the dimensions matched the drawing. I was also able to scale off the below photo of the rear wall of the roundhouse to determine the height. These dimensions were also compared to those of the Cowra roundhouse.


If you compare photos of the window frames you will see that Muswellbrook's window frames were more rectangular than that of Cowra's Square frames. Although Cowra's square window frames differed by quantity per frame, The distance between the main posts are the same for both. Andrew was now able to draw up some frames from the researched dimensions of both Muswellbrook and of Cowra's two different frames.

Cowra Windows 1
Cowra Windows 2
Muswellbrook Windows

       After waiting patiently for these to be fitted on a test etch, a couple weeks ago I finally received the samples. Before sending the sample off to Adam, I needed to make sure that, A, the etches fit the correct frames, and B, that I was able to construct the frame and reproduce them in polyurethane.
From the drawing and the measurements taken at Muswellbrook I set about constructing the rear wall. Hold Up! Not as easy as that. For me I needed to work out the exact length of the engine shed and its relation, or position, to the mainline. As the drawing did not match the roof profile of Muswellbrook's, I needed to find out if these matched the drawings also. My last trip to Muswellbrook revealed that there were two main posts along the centreline dividing each of the stalls, however they were not evenly spaced like the drawing. The middle post measured 36'feet from the rear brick wall, while the front post was only 28' from the centre post. Looking at the below photo reveals that the front post was set back from the front line of the gutter, or end of the roof rafter which explains the set back distance of the front post. You can also see that I have drawn a line roughly along were the roof rafter and lower truss beam would be and measured the angle with a protractor. 11 Degrees. Pretty close to the drawing. I was told by someone that the roof trusses from Muswellbrook roundhouse were used to rebuild Cowra's???

 
Next was to determine the location of the roundhouse in relation to the mainline. I wanted to make sure I had the shed looking correct when on the layout. I used Google Maps to print out a satellite view of the loco depot area. I drew a horizontal line along the mainline, then using a square, drew a 90 degree line from that, intersecting the centre of the turntable. The filled in pits of the engine shed can bee seen on the image so a line through the centre of stall 1's road was drawn to the centre of the turntable. Again using the protractor I could determine the angle of stall no.1........23 degrees.


As I have not started the layout bench work yet, I used a temporary sheet of MDF to mark out the full size floor plan of the turntable and roundhouse area using the researched dimensions and angles. While at Muswellbrook I measured the distance from the turntable pit wall to the rear of the brick wall of the shed adding on 37'6"(half of the 75' turntable), equalling 170'. The scaled out measurements of the Turntable centre, pit wall, front and mid shed posts and rear wall were marked out on a strip of styrene, holes drilled at these locations and using a small pin through the location of the turntable pit centre, radius line were marked. The five rear wall sections were marked out at 24' centres using the straight line from the turntable centre point. I now have a completely accurate plan of the turntable and shed in its correct orientation. I could now start to construct the shed.


To be continued:


Tuesday, June 25, 2013

AndIan Models Has A Blog

AndIan Models now has a Blog. From now on I will be posting details about our kits there rather than on this one.
This will also supersede the email list I started for our Bulletins which are also on the new Blog.

Check It out here.

Friday, April 26, 2013

Copping it from all angles

I have been copping a bit of curry for not posting on the Blog, so settle down guys here it is. I also received pressure about the Luffing crane. The monthly modelling days have provided me some time to set aside the 'jobs for others' and get some done for myself. I used this time to make a start on my Luffing crane, as shown a few posts back. I completed the assembly and installed a TCS M1. Wow! I was amazed how well it ran.......Like a Swiss clock! It did however have trouble with electrical pickup, even with all wheels having phosphor bronze wipers and good track work, it still seemed to stall here and there. At the next modelling day I showed the guys......they were all impressed but did comment that it was missing sound. C'mon......give me a break. The thing is that small its hard enough to fit in a normal decoder! I thought a bit about what its use would be.....Pretty well stuff all! Its too small and inappropriate for a train consist, so figured that it would really only be conveying an S wagon around the yard cleaning up junk and stuff. While doing some testing on the loco I coupled it with the S wagon I used for the recent AMRM review (April 2013) for Ian Lindsay's Compensated chassis. It sprung to mind that I could install the sound in the S wagon and permanently couple it to the loco. I am not generally supportive of this idea as it does not allow the loco to run 'light' - on its own. The compensating of the S wagon also provides guaranteed electrical pickups if I install wipers on all four wheels (coupled with the loco wheel pickups) as all the wheels will be in contact with the rails.
I begun by drilling several holes in the floor to let the sound out. I used a 20mm high bass speaker with a 750 Tsunami mounded directly behind. In hindsight I probably should have looked into something with a more appropriate whistle other than the usual K class decoder. I had one spare so ended up using that. I may end up changing it to something different later on. I used 0.010' phosphor bronze for pickups soldered to a PCB strip inside the wagon body then passed through the floor and bent to rub along the inside of the wheel with very light pressure to ensure the wheels will still spin. A sheet of styrene painted flat black was used to cover it all up and provided a top for the speaker box I created around the speaker. The decoder wires were run down through the floor just in front of the speaker box. I covered the plain styrene with heaps of 'junk' detail castings, bits of brass tube, corrugated iron offcuts, chain etc. all painted and weathered to a rusty colour. I also used some chalk weathering to blend it all in. It came up pretty good. I decided that to give the best sound affect I would couple to S wagon with the speaker closest to the loco and with the loco funnel to the wagon. It will normally run cab forward with jib trailing. Before all this can be done I needed to paint the loco.
I usually try and push my limits when I do modelling projects. For me it seems to help improve my modelling. So I guess that the most complicated paintjob for me to tackle would be black with Green side tanks and  red and buff Lining. 1052 was at one stage painted in this livery. There is some great pics in the Luffing Crane article in AMRM June 2001. 1052 is also conveniently preserved at the Railway Museum at Dorrigo still showing some of its lined green paintwork and I could access it to take some detail photos. It was also fitted with Auto couplers.

The paint job begun by disassembly of the loco and painting all its components with mirror tone etch black. I also decided to fit a cam disk to one side of the front driver witch meant removal of one wheel. This was of course done before I painted everything black. I then begun the tedious task of masking it all up for the green. I was unsure of the correct colour and due to the fact that 'it never run at Muswellbrook', the correct colour did not matter. I chose TLB's Verdant Green as used for the 38 and 40 class. This was Ideal as I for one didn't need to source it as I had some old stuff here. OK, so you historical Goo roos can tell me now the correct colour.
The red and buff lining proved a challenge. I purchased with the kit bergs lining decals to suit. These are very nice indeed but only provide plain red or plain white. Without layering the decals with a second buff line work, it was easiest for me to hand line the buff directly to the decal sheet using my lining pen. The decal sheet is provided with either square cornered or coved cornered decals. 1052 had the plain square cornered lining so I proceeded to run the buff line just inside the red using a ruler for the straights and coved styrene templates for the corners. The buff is perhaps a little thick but it seemed to look the part. I did find however that once the decals were submerged in the water, some of the pigment bled out from the red line work witch made the buff really stand out. I found too that several applications of decal set were needed to get the decals to soften and conform around the rivets of the side tanks.
The AMRM pics of 1052 show that it had the NSWGR coat of arms crest on the back of the loco. This decal was sourced from Warren at Gwydir Valley Models from some of his old stock. I hand painted the red buffers and sides of the footplate and decaled the white numbers to the front. I finally gave the model a very light weathering and added a few extra details like cab side curtains made from stained tea bags, fireman's shovel sitting on the side tank, fire irons prototypically hanging on the rear handrails and a few ropes etc. hanging from the front buffers and of course a driver. I coupled the prepared S wagon and wired in the decoder to the loco. These locos were never fitted with electrical lights but I wanted to use at least one of the light functions. One of the pics of 1083 in the AMRM article shows a kerosene lamp mounded to the rear of the loco. From the photos and the prototype at Dorrigo 1052 was only ever fitted with a lamp bracket at the front in front of the funnel. As I wanted to run it cab forward I used my 'it never run here anyway' theory and fitted one to the rear. I tried to find a casting of the one I wanted but could not seem to come up with anything, so pushing my limits again I made one up from a section of square brass bar turned in the lathe. I drilled a hole through the centre for the light and fabricated a wire handle for the top, painted it silver so it would stand out. Hey Presto! a working Lantern.
With extra pickups on the S wagon it now runs perfectly with no interruptions. See video below.

Here are the pics before I weathered and detailed it.


You will notice in the video I did end up creating a small train consist. I am calling it a breakdown train. I found a pic of a departmental CV Van in way and works cream with heavy weathering of its peeling paint. I used an Austrains CV for the van itself and created the peeling paint affect by applying Humbrol Maskol in patches over the pre weathered body. When the Maskol had dried a light application of way and works cream was applied with the airbrush. When this was dry, I removed the Maskol with the end of a small skewer by rubbing it gently along the boards. This leaves a nice peeling paint affect. I left a couple areas with paint so I can apply some appropriate decals. I still need to get one done for the side and a little more weathering to finish off.

I am more than happy with this little model. Its the only one I have ever seen run, and indeed possibly the only one with sound.

Here is the Video!

Catch up soon.

Ian

Friday, March 1, 2013

Classic Brass 25 Class for sale

Hi All,
I have a Classic Brass 25 class for sale. Its prety much New but has beed painted. Will need repainting as its a bit rough, at my standards. Has its original box. Selling for a friend. $650. Can supply photos to those who may be interested. iphemist@dodo.com.au

Cheers
Ian

Friday, January 18, 2013

New Blog Check it out!

Hi all,
A good mate of mine has started a blog. Best check it out. He does some nice work and his layout will be superb.
http://grenfallg.wordpress.com/2013/01/15/brief-overview/


Cheers
Ian

Saturday, January 12, 2013

Get In Before EBay

Hi all,

I have a couple brass models for sale. They belong to a friend. Was not sure if anybody was interested before they go on EBay.

They are: Classic Brass Models JHG Brake van. Brand New, mint condition. Boxed $180.00

Mansfield Hobbies 4-8-4 4-8-4 AD60 Class Garrett. Again, Mint condition, basically brand new. I have tested the loco. As expeded runs perfectly. Very nice model indeed. It did need a light oil, though I have only done the axle boxes so as not to get the motion oily for painting. $1800.00. (there is one on EBay for $2300..........!)
Both the above are unpainted. Boxes are in perfect condition. I can supply photos if need be.
iphemist@dodo.com.au

Ian

Thursday, January 10, 2013

Moving the Riverina to the Hunter Valley.

Once or twice a week I religiously check my blog reading list for new posts from my favourite bloggers and am quite often disappointed by those who have not posted. I am then reminded of the fact that I have not posted myself. Again, seriously late at posting but better late than never. So what I have been up to over the past four months? Not a great deal as far as I am concerned. I have not done what I should have.........
Late last year I decided to start a Modelling day at my place with a few fellow modelers. Six of us get together once a month to actually do some modeling rather than talk about doing it. Now that my railway room is finished and ready for a layout, I set up some benches so as the guys can set out their work and if need be leave it till next time. One of the modelers, Alan Tarrant, who recently moved from Sydney to the area, has a beautiful exhibition layout ‘Bullenbung Creek’. Al was working on the silo for the layout at the modeling day but soon realised that he needed the layout to position some of the items on the silo. Over the course of the day the conversation come up about the construction of Muswellbrook. I have so much work built up for customers and friends that I cannot realistically start on the layout for 12 months or so. Al suggested setting Bullenbung creek up in the train room till I was ready to start on the layout. This provided Al with the layout on hand to complete his silo and till he builds his own room, it allowed me to use it for testing the many locos I have to build.......OK and to play trains! The very next modelling day the layout was transported to my place and set up in the train room. The layout ‘Bullenbung Creek’ is based on the line form Uranquinty to Kywong in the Riverina. About half way along the line is Belfrayden witch the layout is based on. Alan explained that the water tank and bridge (actually called Bullenbung Creek on the prototype) is farther apart than that modelled. So, like my blog posting says, the Riverina has moved to the Hunter valley.......Well for now anyhow. Here is a video of some trains running on Bullenbung Creek and also a shot showing the layout in the train room.

The modelling days have provided me with a chance to do some modelling for myself. Try and get some of my own kits done instead of building stuff for others. At the Liverpool exhibition this year I purchased one of Bergs Luffing crane kits. Yes I know they didn’t run at Muswellbrook but surly I can have one model that didn’t. I was also told that they are quite difficult to assemble and get running. In all the time I have been around and attending exhibitions I have never seen one actually run! I decided to use the modeling days........and a few others, to build up the crane. The assembly of the chassis is generally straight forward. I assembled the chassis on the assembly Jig, as explained in Australian Journal of Railway Modelling no 7, the same as what was done with the 57 project I posted about some time ago. This ensures all is straight, all the wheels touch the track and also allows the correct location of the coupling rods without unnecessarily filing out the coupling rods. The Walschaerts valve gear would have to be the most frustrating. Most of the bronze valve gear castings are held to the sprues with quite bulky amounts of brass and careful removal and lots of filing was needed. Just about all these parts need to be pinned with brass pins and soldered in place so as they can move about. Quite difficult to achieve as they are quite small to handle. Remember that the whole loco is about the length of an S wagon (see photos below). After lots of F’s and C’s I managed to get the valve gear assembled and working. The footplate and boiler assembly also tests ones patients. The boiler is made of three white metal castings with brass sheet wrappers for the boiler. The brass wrappers need to be firstly rolled to half round then soldered to the white metal sections. This boiler assembly is then attached to the footplate followed by the jib assembly and finally side tanks and cab. At this stage I have the model basically assembled. Just a few more pipes etc to add. I have fitted at this stage a TCS M1. It runs very well and am quite happy with the result. I have had shit put on me for not fitting sound........I’m still working on that! But it’s way too small for a speaker and decoder! I intend to base this engine on 1052 in lined green livery.

Completed Boiler assembly.

Footplate ready for Boiler

Jib and side tanks ready for the footplate

Completed chassis with full working Walchaerts valve gear.

View showing cab details.

Assebled loco less cab and a few pipes, Shows the size compared to an S wagon. I could fit the sound to the S wagon and permanently couple the wagon.
 Outside of the modelling days its work as usual. I have been working on several projects at once to try and get some jobs finished. I managed to finish off a couple review items for AMRM that I had been working on before Christmas. You will have to check out the next issue for the latest one. I have two more to do that I am currently working on. Again, you will have to wait for coming issues of the mag to check these out. I have several loco kits to build for both friends and customers. I have assembled the chassis for a 30T; again this was done on the assembly jig to ensure everything is true and correct. I don’t have pics of it as yet......Pretty boring really. I have progressed further on the 2nd loco in the order of jobs, a branchline ROD. The ROD kits are quite good however I will be replacing the direct drive motor with a gearbox and motor from High Level Kits in the UK. I have managed to get the tender assembled ready for paint before installing the sound decoder and I have the chassis done at the stage of fitting the crossheads and connecting rods. Again the chassis was built up on the jig requiring just small movement of the bearings to correctly position the coupling rods.

Here is the ROD at its current stage ready for crossheads and conecting rods.

On the AndIan Models front, things have slowed a little. We were hoping to have our four wheel water gin project ready for the Armidale convention however there were some complications with getting the last etch samples of the underframe witch put the release date further behind. There were another couple issues that arose that has still stalled the kit being released. The same issue has also stalled the revised BLV kits. Our supplier of the brass castings for both the BLV, Water Gin and not to mention the turret tender project has let us down suppling the required parts. This has forced us to dump this option and get these parts produced ourselves. As a trial, we assigned John Dersch to master and cast the brake cylinder for the water gin along with also casting in brass the axlebox with spring details, turret filler hatch and valve tap detail (from our own masters) for the gin with very pleasing results. We have now decided to have John cast the Turton Buffers for the BLV and straight buffers for the water gin from our own masters. As of today I received from Andrew the Rapid prototyped masters for both types of buffers. I will critique these before sending them to John for casting. We will also be going down this road with all the required details for the Turret tender project that many are wanting......Including myself. We have now 50 odd sets of the new multi piece BLV bodies done ready for the kits along with the same amount of water gin tanks. The casting process of the one piece BLV body proved quite costly and little difficult to cast when trying to keep fine quality of the body. So the body was re mastered into a multi piece body.  

Here is the remastered BLV body. Just a little more work for the modeler.
I have also managed to build up a sample of our 36’ riveted tank wagon underframe which we have had etched. This is looking very nice indeed. We have made several trips to Dorrigo to measure and photograph MOA 141 and the bogie acid tank wagon SUL 22 both of which have generally the same underframe and will be available as kits from us in the future. We are undecided what method we will adopt for the riveted tank. We will either make a brass master to have cast or supply the modeller with a custom decal from Archer decals for the rivets. We will be using Gwydir Valley filler hatch and tank anchor castings for the MOA tank, well at this stage anyways. There are some small details missing from the domes. The acid tank parts will need to be mastered.


Below are the shots of the water Gin at its current stage. Prety much complete. Just waiting on buffers.
You will see in the pics the brass details cast by John.


During my spare time, Ha! , I blew the dust of the Mike McCormack LFX boxes and managed to get the 2nd set of bogies finished. I have noticed a few other bloggers have started on theirs and didn’t want to be left behind. Will try and keep moving forward with these on the modelling days especially once the Luffing crane is finished . I need to get both the LFX cars built up to painting stage so I can paint the two together.
Last weekend our Exhibition layout group held our anual open day at the local showgrounds with great sucsess. Both days the crouds were unreal. Most of the day it was four deep of people trying to get a look at the displays. Along with our own layout we had Alans Bullenbung Creek on display along with member Bill Baggets U-Drive shunting layout. Bills Layout proved very popular with the kids allowing them to get hands on experience at shunting the cars into the industries. We also had memeber Alan Harris do some trackwork demonstrations on his modular layout he is building. The day was very succesfull indeed. We also had great fun putting shit on a Friend of Alans, Ben Small. Ben came up from Sydney for a holiday staying with Alan for a week and was a great help running Bullenbung Creek at the open day. Ben is the Layout Manager for the Epping Clubs Thornleigh Exhibition and seems very knologable with the NSWGR passenger cars. He has also been experimenting with the correct valve or chuff timing for a 57 using a soundtraxx decoder and custom cam chuff kit. His sample of the cam sounds terrific and sounds more authentic than the modified soundtraxx cam. Wednesday this week we took Ben to the Dorrigo Railway Museum for a bit of a look. Keith allowed us to show him around the museum. Ben was pretty much like a kid in a lolly shop. We had trouble containing the drewel! We had a great week with Ben and look forward to catching up again soon.......Maybe we will see some completed models Ben? 

Bullenbung Creek at the Open Day.

Heres Bill with crounds of people waiting for a go at the U-Drive layout.

And of course the clubs Big layout.


Hope you all had a great Christmas and all the best for a great modelling new year.

Ian